Источник:
http://mscrmtools.blogspot.com/2011/...n-element.html
==============
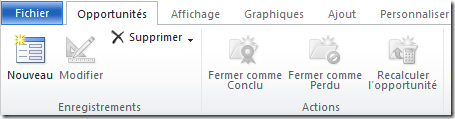
Today, I will try to explain you how to change properties of existing ribbon elements. For this example, I will change the label and icon of the button “New opportunity” in the main grid ribbon of the entity “Opportunity”.
The standard ribbon for the opportunity looks like the above one:
And the result I expect:

To obtain this result, follow the above procedure:
1 - If it is not already done, download the SDK (
click here).
2 - Open the SDK folder “samplecode \ cs \ client \ ribbon \ exportribbonxml \ exportedribbonxml”. Then open the Xml file corresponding to the entity (here opportunity.xml). In our case, the button “Nouveau” (or “New” in english), is the one we need to retrieve:
.csharpcode, .csharpcode pre
{
font-size: small;
color: black;
font-family: consolas, "Courier New", courier, monospace;
background-color: #ffffff;
/*white-space: pre;*/
}
.csharpcode pre { margin: 0em; }
.csharpcode .rem { color: #008000; }
.csharpcode .kwrd { color: #0000ff; }
.csharpcode .str { color: #006080; }
.csharpcode .op { color: #0000c0; }
.csharpcode .preproc { color: #cc6633; }
.csharpcode .asp { background-color: #ffff00; }
.csharpcode .html { color: #800000; }
.csharpcode .attr { color: #ff0000; }
.csharpcode .alt
{
background-color: #f4f4f4;
width: 100%;
margin: 0em;
}
.csharpcode .lnum { color: #606060; }
3 - Create a new solution with the opportunity entity included and export it.
4 - Add a CustomAction with the correct location in the CustomActions node of the customizations.xml file contained in the exported solution archive. Only two attributes are required:
- An identifier of your choice
- A location (the location of the existing button): You will find the correct location in the parent node of the existing Xml button (in the opportunity.xml file). It is the attribute “Id” of the parent node. The location will be the concatenation of this id and the term “._children”.
5 – Add the Xml of the existing button
6 – Change the properties of the button (here, highlighted in yellow)
.csharpcode, .csharpcode pre
{
font-size: small;
color: black;
font-family: consolas, "Courier New", courier, monospace;
background-color: #ffffff;
/*white-space: pre;*/
}
.csharpcode pre { margin: 0em; }
.csharpcode .rem { color: #008000; }
.csharpcode .kwrd { color: #0000ff; }
.csharpcode .str { color: #006080; }
.csharpcode .op { color: #0000c0; }
.csharpcode .preproc { color: #cc6633; }
.csharpcode .asp { background-color: #ffff00; }
.csharpcode .html { color: #800000; }
.csharpcode .attr { color: #ff0000; }
.csharpcode .alt
{
background-color: #f4f4f4;
width: 100%;
margin: 0em;
}
.csharpcode .lnum { color: #606060; }
7 – Import back the solution, that’s it!

Источник:
http://mscrmtools.blogspot.com/2011/...n-element.html