Источник:
http://www.dynamicsaxtraining.com/dy...ouse-equipment
==============
Hi Axapta People! Before we start purchase business process we must setup initial data in Axapta. I this training lesson we will understand and setup: vendor, warehouse structure, pallets and forklift! Let’s begin.
Recall the initial data:
- Company purchase 5,000 0.5 Green Bottles and 3,000 Standard Black Cans
- Company vendor is “Big bottle” company
We need more data for full-fledged purchase process (I suppose that you download
demo data):
- Company warehouse structure
- Company pallet types
- Company forklifts
- Extend Bottle and Can dimension to be able track pallet and location
Vendor
We might create “Big Bottle” vendor:
- Go to Account payable -> Vendor details. The Vendors form is opened.
- Create new record (Ctrl +N). Fill in following fields: Vendor account=”1000″, Name = “Big Bottle”, Group = “50″.
- Save the record. (If you encounter with error “Number sequence for the reference Address book ID in parameters in the Global address book module has not been set up” do following.)
We have setup vendor. One field that we should discuss is Group. What for this Group field? Remember in
this training lesson we setup general ledger accounts for items. We have studied that general ledger account contain information (in money equivalent) about concrete type of assets, liabilities or shareholders equities. If company need to distinguish item cost (it is asset) purchased from different groups of vendors then vendor group helps. This field related to Financial training scope. So I don’t explain one in details in this training. But write
short example that can help you to understand what for vendor group is used.
Company warehouse structure
Company warehouse physical structure contains:
- Sites. Site is geographical location. Site includes one or several warehouses.
- Warehouses. A warehouse is a commercial building for storage of goods.
- Aisles. An aisle is, in general, a space for walking with rows of seats on either side or with rows of seats on one side and a wall on the other. In warehouses rather than seats they have rack to either side.
- Racks. Rack is a material handling storage aid system designed to store materials on pallets. One more rack example.
- Shelves. The Rack system composed of Shelves.
- Bins. Bin it is position on the Shelf.
Company warehouse logical structure contains:
- Locations. It is physical place in warehouse that must be used as one entity. Location could be entire aisle or rack or shelves or bin. If for example warehouse have only aisles and rack (without Shelves and Bins) than location is entire rack.
- Store areas. Store areas group locations by dividing the warehouse into designated sections for inventory with similar characteristics. There are two types of store area, and every location is connected to one of each: Input area, Picking area. Input area is used in connection with where items are stored when they are received in inventory. Picking area is used to determine picking routes.
- Store zones. Store zones are used for prioritizing the store areas for arriving items. The store zones are thus made up of store areas. We understand the meaning of this entity later in this training lesson.
To setup company warehouse structure (physical and logical) go to
Inventory management ->
Setup ->
Inventory breakdown.
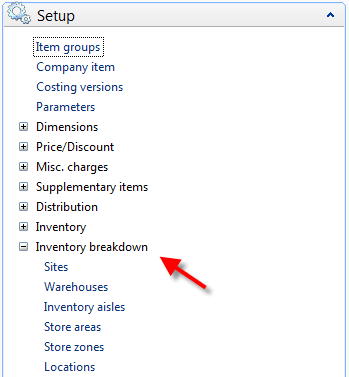
Inventory breakdown
Under
Inventory breakdown menu we can find:
Sites,
Warehouses,
Inventory aisles,
Store areas,
Store zones and
Locations menus. Be aware that rack, shelf and bin are not warehouse entity. We can’t create rack, shelf or bin and work with them (for example associate to Location or inquiry on-hand for shelf). In Axapta Shelf, Rack and Bin is properties of Location. When Location created user select if location is rack, shelf or bin. For example, in the picture below Location is Bin that situated in 1 Bin on the 2 Shelf in the 1 Rack in the 01 Aisle in the 22 Warehouse.
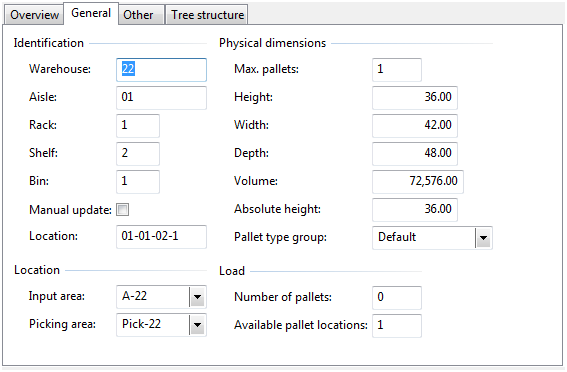
Location example
In our training we will use “22” warehouse. This warehouse contains 7 aisles. 6 aisles are used to store goods and one aisle is used to receipt and issue goods to and from warehouse. This one aisle is called “Special”. Each aisle (with the exception of “Special”) consists of: 15 Racks with 3 Shelves with 1 Bin. In this case Location is Bin. Location name consist of aisle, shelf, rack and bin. “Special” aisle doesn’t have any racks (and shelves and bins) this “aisle” contains 5 inbound and 5 outbound
docks.
Inbound and outbound dock is location. In this case Location is part of aisle. In our demo data location has name (In_01 or Out_05). EMPTY-P location is also part of aisle that will be used to store empty pallets.
Let’s find all these settings in Axapta. I prepare several screenshots from our demo data.
To find this setting do following steps:
- To access Warehouses form go to Inventory management -> Setup -> Inventory breakdown -> Warehouses
- To access Inventory aisle belong to current warehouse. On the Warehouses form click Inquiries -> Inventory aisles.
- Each aisle (except “Special”) contains racks, shelves and bins. Location in this case is Bin.
- From Inventory aisle form click the Locations button.
- Locations form will be shown. This form show locations belong to current aisle.
Location has several types:
- Bulk location. Storage of received items. Identifies locations where items are stored until they are either moved to an outbound dock or used to fill a picking location
- Picking location. Storage of item ready to picking (for sales process).
- Inbound dock. Location in the warehouse where items are received.
- Outbound dock. Location in the warehouse where shipments takes place.
- Production input location. Location is used in Production module.
The following picture help to understand what for different location type exists.
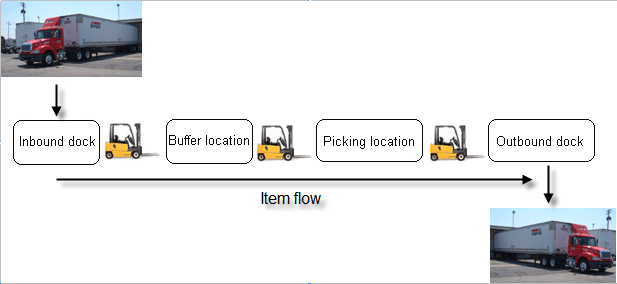
Location types
For example, in the Arrival journal (
Inventory management ->
Journals ->
Item arrival ->
Item arrival menu) item can arrive only in location with “Inbound dock” type.
Some words about Store zone and Store area. In Axapta Warehouse Management store zones and areas are used for automatic placement of items in preferred locations. Store area groups locations. Store zone prioritizes the store areas.
Let’s assume that Bottle item arrive at In_01 (inbound dock) location. Where to store this item? Item is associated with store zone. This is done via
Warehouse item form.
Associate Bottle item with store zone:
- Go to Inventory management -> Item details. The Item form is opened
- Find Bottle item. Set cursor on this record and click Setup -> Warehouse items. The Warehouse items form will be shown
- For all Bottle dimensions we will use the same setup. We assume that Bottle item will arrive in “22″ warehouse
- Create new record (Ctrl+N). Leave item Dimension field empty and fill Warehouse field with “22″ value
- To assign store zone go to Locations tab
- Setup following value: Store zone = “All-22″
- Save record (Ctrl+S).
Setup Can item with the same value.
We have setup “All-22″ store zone for Bottle item. Let’s find what store areas belong to this store zone and how store areas are prioritized.
- Go to Inventory management -> Setup -> Inventory breakdown -> Store zones. The Store zone form will be shown
- Find “All-22″ store zone and go to Store areas tab. The folowing tab will be shown:
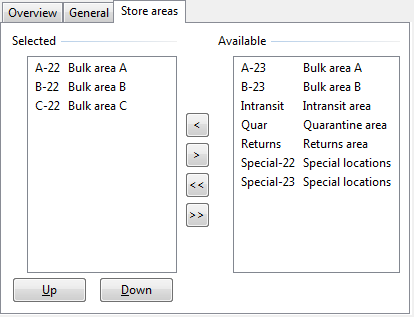 Store zone, Store areas tab
Information on this tab tells us that foremost Axapta will try to put Bottle item in location from A-22 store area. If there are no available locations then location will be found in B-22 store area. If there are no locations then location will be found in C-22 store area. If no appropriate location will be found then error message will be shown: “Cannot find location for item Bottle at warehouse 22″.
To find what location belong to A-22 store areas:
- Go to Inventory management -> Setup -> Inventory breakdown -> Store areas. The Store area form will be shown
- Find A-22 store area and set cursor to this record. Click Locations button
- The Location form will be shown. This form tell us what locations associated with “A-22″ store area
 Locations form
Extend item dimensions
Bottle and Can item have following storage dimensions: Site and warehouse. Since we want track pallets and locations. We should change dimension group. What is mean “track locations” (or pallets)? It is meaning that all inventory transaction (except Ordered) should be recorded with location id (pallet id). By means of it we can inquiry how many Bottles are stored in certain location or how many Bottles exist in “555″ pallet.
To change item dimension:
- Go to Inventory management -> Item details. The Item form will be shown.
- Find Bottle item. Go to General tab and change Dimension group field from “CS-W” to “CS-WLP”. “CS-WLP” dimension group has active Color, Size, Warehouse, Location and Pallet dimensions. Note: If you have at least one transaction with this item then Axapta deny changing dimension group. If you want to delete all transaction in current company do following.
Setup Can item with the same value.
Inventory equipment
Now we will setup pallets type and forklift presented in our company. Setup can be found here:
Inventory management ->
Setup ->
Inventory equipment.
Since
pallet could have different height, width and depth dimensions we should create different pallet types. I suppose that you use demo data, so I just present only screenshot:
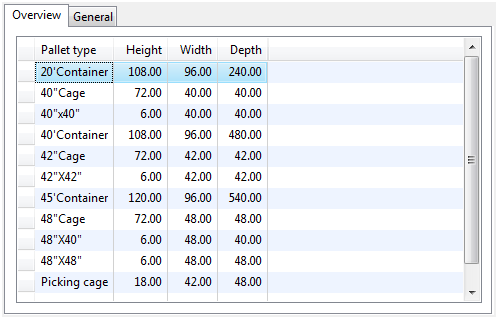
Pallet type form
Now we should create pallet groups. Each location has a pallet type group parameter:
Inventory Management ->
Setup ->
Inventory breakdown ->
Locations form.
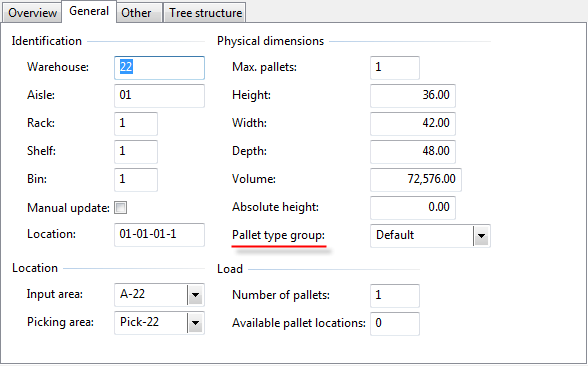
Pallet type group on Locations form
Pallet group show what pallet type can be stored in this location.
In my demo data I have following pallet groups:
- “Default” pallet type group contain: 40″x40″ and 42″X42″ pallet types
- “Large pallets” pallet type group contain: 48″X40″ and 48″X48″ pallet types
- “Picking cages” pallet type group contain: Picking cage pallet type.
Let’s setup
forklift. I assume that we will use only one forklift in our company warehouse. So, the
Forklift form screen shot:

Forklift form
Ok, we have done a good work! We have setup all necessary data for purchase business process (to be more certain for receiving part).
Training Lesson Summary
Today we have setup initial data for purchase business process (receiving part).
Let’s remember what we have done:
- Create “Big Bottle” vendor
- Understand and setup company warehouse structure: warehouses, aisles, racks, shelves, bins and locations
- Extend Bottle and Can dimensions (add Location and Pallet).
- Understand and setup company warehouse equipment: pallet types, pallet groups and forklifts.
In the next training we will create purchase order and receive items in warehouse.
Technorati Tags:
inventory breakdown,
inventory equipment,
vendor
Источник:
http://www.dynamicsaxtraining.com/dy...ouse-equipment

 Inventory breakdown
 Location example
 Location types
 Pallet type form
 Pallet type group on Locations form
 Forklift form