Источник:
http://atinkerersnotebook.com/2013/0...amics-ax-2012/
==============
This week I have been working with the Lean Manufacturing capabilities within Dynamics AX 2012, and had the opportunity to set up a number of different examples of how the Lean Manufacturing functions. I have to admit, I think this is very cool, and is pretty easy to set up.
In this worked example I will show you how you can create a simple set of Lean Manufacturing processes and see them in in action.
Configuring a Value Stream
There are a couple of codes that need to be configured before we can start building our Lean Manufacturing processes. The first is a Value Stream, which allows you to segregate out your Lean Manufacturing processes.
How to do it…
To create a new value stream, follow these steps:
- From the Production Control area page, select the Value streams menu item from the Organization folder within the Setup group.
- When the Value Stream maintenance form opens up, click on the New button to create a new Value Stream.
- All you need to fill out in the Value Stream is the Name and the Search Name fields.

- After you have done that, click the Close button to finish.
Configuring a Production Group
The next code that needs to be configured is the
Production Group. These configure the default GL posting profiles for your production flows.
How to do it…
To configure a new
Production Group, follow these steps:
- From the Production Control area page, select the Production groups menu item from the Production folder of the Setup group.
- When the Production groups maintenance form opens up, click on the New button to create a new record.
- In the new record, specify the Production group and the Name. We will not need to configure the default prosing profiles at this point.

- When you have finished doing this, click the Close button to exit out of the form.
Creating a Production Flow Model
Finally, we need to create a new
Production Flow Model for our example. This will define the default options for our
Production Flows and will be used by Dynamics AX to define how the Production Flows are planned.
How to do it…
To create a new
Production Flow Model, follow these steps:
- From the Production Control area page, select the Production flow models menu item from the Lean Manufacturing folder of the Setup group.
- When the Production flow maintenance form is displayed, click on the New button in the menu bar to create a new record.
- Enter a name into the Production flow model field.
- In the Model type field, select the Throughput option.

- Within the Kanban schedule group, select the option that you want to use in the Cpacity shortage reaction field. In this example we chose Postpone.

- Within the Planning period type select the time interval for planning. In this example we will plan daily.

- Then specify the Planning time fence value.
- Finally, set the EPE Cycle in days to 1.

- Once you have set up the Production flow model click the Close button to exit out of the form.
Creating a Work Cell
Now that we have the Lean Manufacturing codes defined, we can start defining our work cells. These are just the normal
Resource Groups that are used in the traditional manufacturing models, except we configure a few additional pieces of information required for the Lean Manufacturing process.
How to do it…
To define a new
Resource Group and mark it as a
Work Cell, follow these steps:
- From the Organization Administration area page, select the Resource groups menu item from the Resources folder of the Common group.
- When the Resource groups maintenance form opens, click on eth Resource Group button in the New group of the Resource group ribbon bar to create a new record.

- Enter a code for your Resource Group into the Resource group field, and a description of the resource group into the Description field.
- Also select the main site for the Resource Group from the Site drop down box.
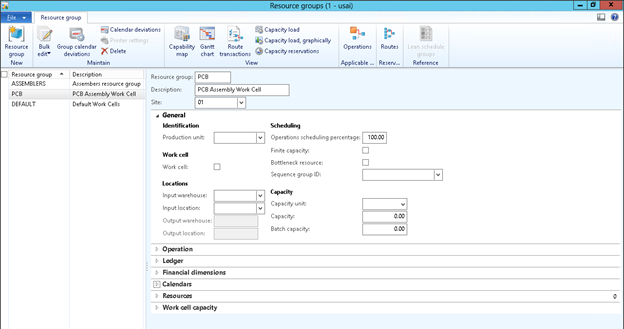
- Check the Work cell box within the General tab to turn the allow it to be used by Lean Manufacturing as a work cell.
- Within the Locations group of the General tab, add the Input and Output warehouse and location for the work cell.

- Expand the Calendars tab on the form, and click on the Add button.
- Then select a calendar for the work cell to operate on.

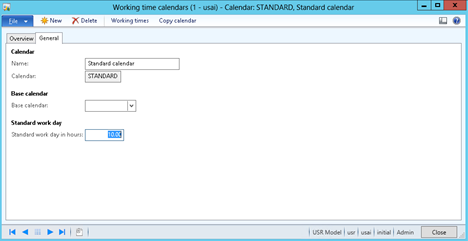
One thing to check is that on the Calendar that you are using, make sure that there is a value in the Standard work day hours field. If you don’t have a value here, then you will grind to a halt later on in the process.
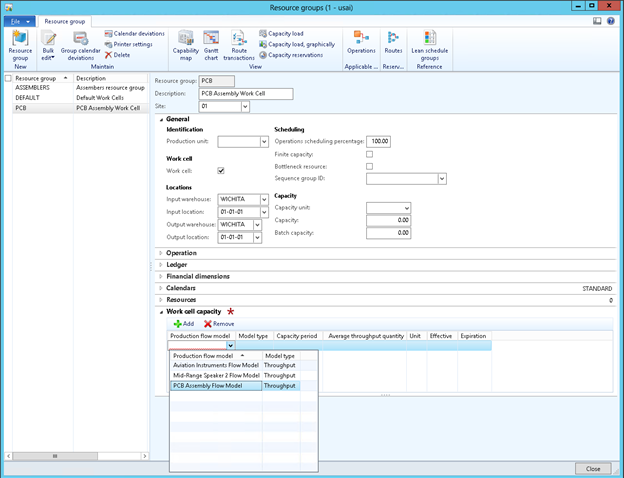
- Finally, open up the Work cell capacity tab within the Resource Group and click the Add button to add a new record.
- Select the Production flow model that was set up earlier on in the process.
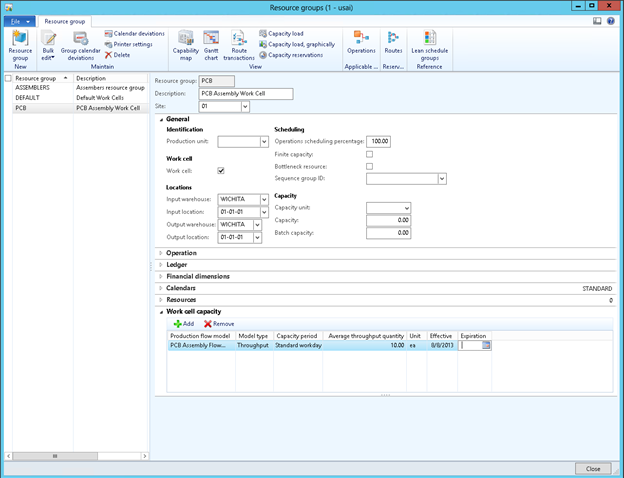
- Select the Capacity period that you want to use for the work cell. In this case, we will use the Standard work day.
- Then define the Average throughput and unit for the work cell.
- Once you have set an Effictive date for the Production flow model, click the Close button to exit out of the form.
Creating a Production Flow
Now we will need to set up a new
Production Flow for our Lean Manufacturing process. The
Production Flows are the Lean equivalent of a production route, and will allow you to group lean activities together.
How to do it…
To create a new
Production Flow, follow these steps:
- From the Production control area page, select the Production flows menu item from the Lean Manufacturing folder of the Setup group.
- When the Production flow form appears, click on the New button in the menu bar to create a new record.
- Enter a name for the Production Flow into the Name field, and a short description into the Description field.
- Then enter assign the Value stream and the Production group that we created in the earlier steps to the Production flow.
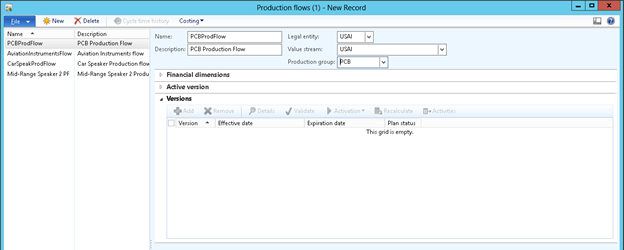
- Open up the Versions tab, and click on the Add button to create a new version record.

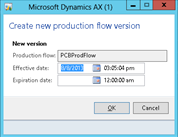
- When the dialog box appears, enter a value into the Effective date field, and then click the OK button.
- Now you will have a version record for the Production flow. You will not be able to activate it just yet though, because you need to assign activities to the Production Flow.

Creating a Production Flow Activity
Once we have a
Production Flow record we need to define the activities that will be performed within that flow. These include production steps and withdrawals (a.k.a. transfers and replenishments), and can be linked together to create production steps.
How to do it…
To create a simple
Production Flow Activity for assembling a product, follow these steps:
- From the Production flow maintenance form, click on the Activities menu button within the Versions tab.
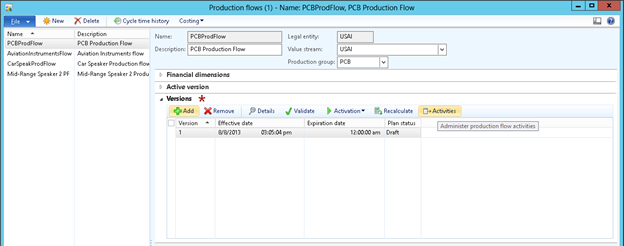
- When the Production flow activities maintenance form is displayed, click on the New version activity button in the menu, and select the Create new plan activity option.

- This will start the Create new plan activity wizard. Click on the Next button to start the process.

- Select the Activity type from the dropdown options. To create a production activity, use the Process option.
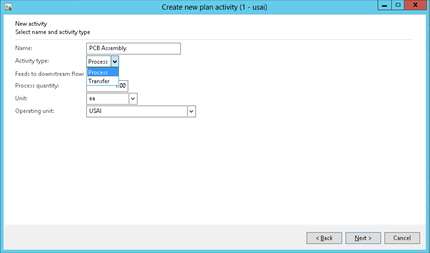
- Leave all of the other defaults as they are and click the Next button to continue to the next step.
- In the next step, enter the Resource group that we created earlier on into the Work cell field.

- Then click Next to continue on.
- In the next form, select the items that are going to be picked for the step in the Lean manufacturing assembly.

- Then click the Next button to move to the next step.
- Then define the default time and unit that it takes to perform the activity in the process.
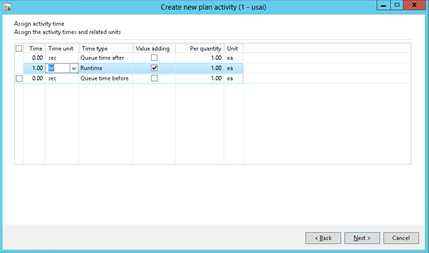
- Once you have done that, click the Next button to continue on.
- To finish the process, click on the Finish button on the wizard.
- Now you will have an activity assigned to the Production flow.

- Exit from the form by clicking on the Close button.
Activating Your Process Flow Version
The final step in the
Production flow definition is to activate the version. Up until now we have not been able to do this because there were no activities assigned to the
Production Flow.
How to do it…
To activate the
Production Flow, follow these steps:
- From the Production flow maintenance form, click on the Activation menu button within the Versions tab and select the Activate option.
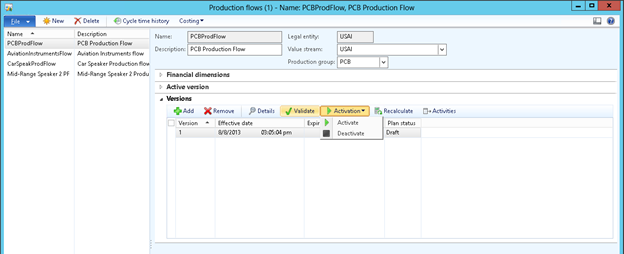
- When the Activation dialog box is displayed, click on the OK button to start the activation.
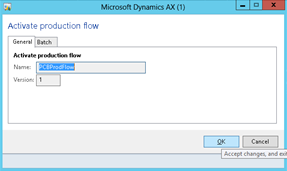
- If everything has been set up correctly, then you will be able to activate your version, and then click on the Close button to exit the form.
Creating a Kanban Manufacturing Rule
The final piece that needs to be configured within the Lean Manufacturing process is a
Kanban Manufacturing Rule which tells the system how to create your Kanban events that are associated with the your
Production Flows. These events could be inventory movements, or production of product, and can be triggered by multiple scenarios within the Dynamics AX.
How to do it…
To create a simple
Kanban Manufacturing Rule that automatically creates Kanban production events whenever a sales order is created, follow these steps:
- From the Production Control area page, select the Kanban rules menu item from the Lean manufacturing folder within the Setup group.
- When the Kanban rules maintenance form is displayed, click on the Kanban rule button within the New group of the Setup ribbon bar.

- Select the type of Kanban event that you want to create from the Type dropdown. In this example we will select the Manufacture option.

- Then from the Replenishment strategy field, select the type of way that you want to initiate the Kanban. In this example we will choose Event because we want this to be triggered from a Sales Order being placed.

- If the Multiple activities check box is checked, uncheck it, because we don’t want to chain activities together in this example.
- From the First plan activity drop down, select the activity that we defined against the Production Flow in the earlier steps.
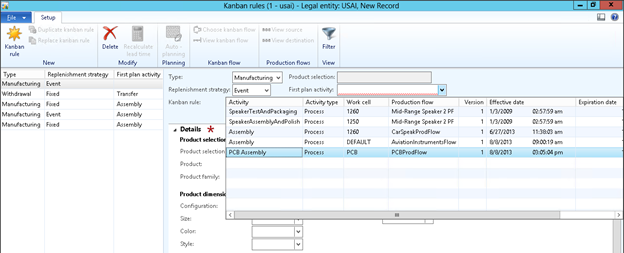
- Within the Details tab, select the product that you want to manufacture as part of the Kanban Manufacturing step, and enter it into the Product field.
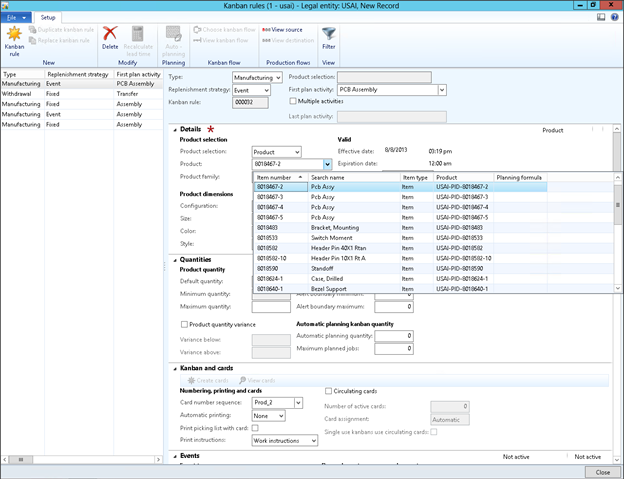
- Within the Quantities tab, you can also set the Maximum quantity field to be the increment size for the planning and scheduling. I am setting this to 1 so that I can see every product that I need to plan at the each level. If you want to plan the production Kanbans at the order quantity level, then you can leave the value at 0.

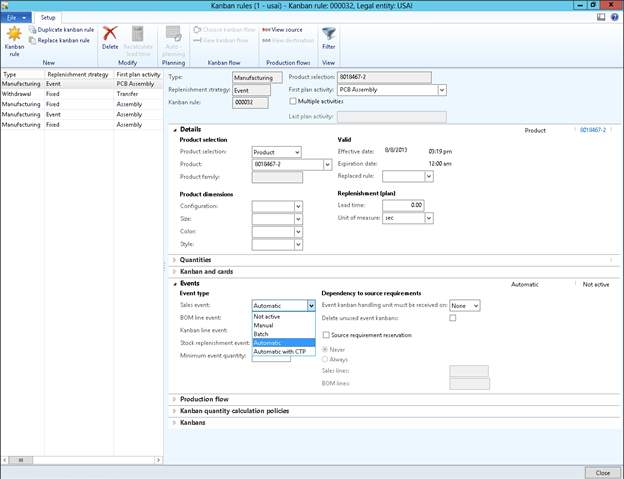
- Within the Events tab, you will be able to select the Sales event type. This is the method that will trigger the Kanban. I selected Automatic in this example because I want the orders to show up on the Kanban planning board automatically when the orders are placed.
- Once you have completed the setup, then you can click the Close button to exit out of the form.
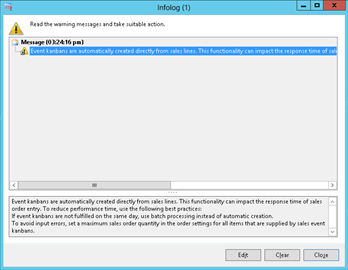
Note: If you select the Automatic option for the Sales event, then it will give you a small warning, but you can ignore it.
How it Works…
Now that we have defined our
Work Centers, our
Production Flows, and our
Kanban Rules we can start placing orders and we will see the orders automatically being sent to our Kanban Scheduling board.
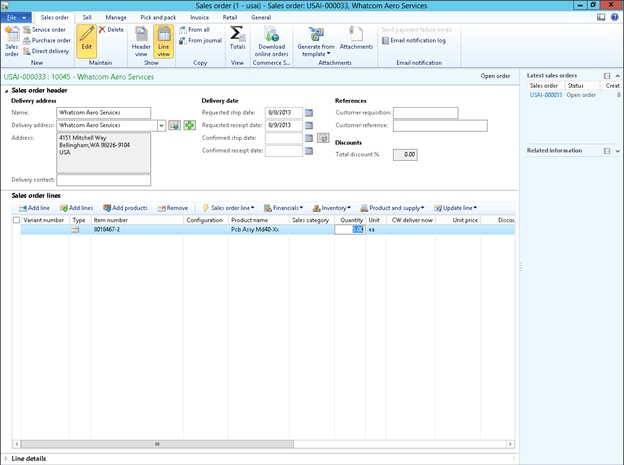
All we need to do in the system is create a Sales order for the product that we have defined the Kanban Sales Event for, and save the line.
Then, from the
Production Control area page, select the
Kanban Scheduling board menu item from the
Lean manufacturing folder within the
Common group.
The lines from the order will automatically show up on the scheduling board, and will be waiting to be scheduled.
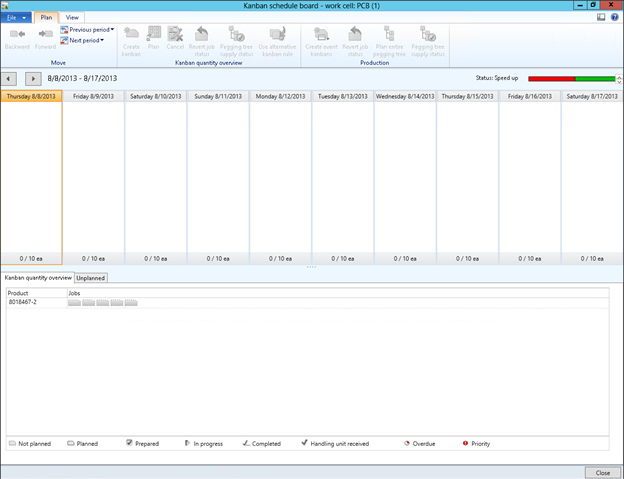 Assigning Tasks to Work Cells Through the Kanban Scheduling Board
Once the Kanbans are sent to the
Kanban Scheduling Board they need to be then assigned to the work cells so that they will show up on their job reporting screen.
How to do it…
To assign Kanbans to
Work Cells through the
Kanban Scheduling Board, follow these steps:
- To assign Kanbans to a Work Cell, just drag them from the Overview area at the bottom of the Kanban Schedule board up to the date that you want the Work Cell to perform the task.

Reporting Jobs through the Kanban Board for Process Jobs
Once the Kanbans have been assigned to a
Work Cell they will then be visible to the users through the
Kanban Board for Process Jobs and they will be able to report the jobs started and completed through a single screen.
How to do it…
To report job updates through the
Kanban Board for Process Jobs, follow these steps:
- From the Production Control area page, select the Kanban board for process jobs menu item from the Lean manufacturing folder within the Common group.
- When the Kanban board for process jobs opens, you will see all of the production jobs that have been assigned to the work cell.

- To start a job, just select the Kanban record, and click the Start button in the Production group of the Manufacture ribbon bar.

- Once the job has been completed, click the Complete button in the Production group of the Manufacture ribbon bar.

How it Works…
If we look at the inventory for the item, then we will see the inventory has been adjusted by the reporting of the item complete.
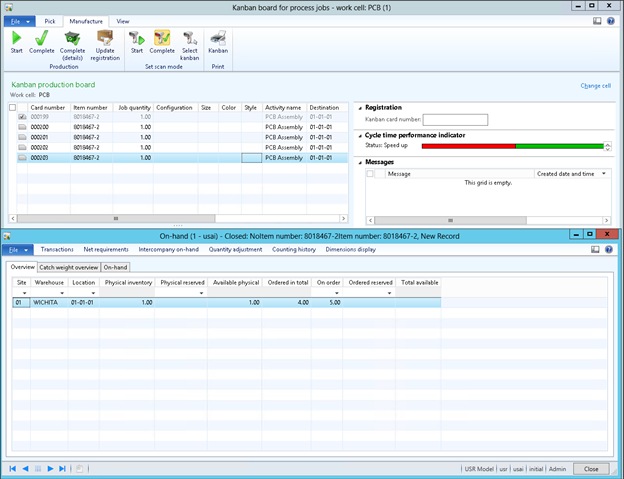
How cool is that.
Creating a Kanban Transfer Activity
Kanbans can also be related to inventory replenishment tasks. When inventory gets below a certain level, then Lean Manufacturing will automatically trigger replenishment of the Kanban bin.
How to do it…
To set up a simple Kanban Activity for a inventory replenishment activity, follow these steps:
- Open up the Production Flow that you just created, and in the Versions tab, click on the Activites button to open up the Process Flow Activities form.
- Click on the New version activity menu item, and select the Create new plan activity option to create a new activity.

- Step through the wizard, and when you get to the new activity page, select the Transfer option from the Activity type and then click the Next button.

- On the next page, select the work cells that will be Replenishing and Replenished and click Next.
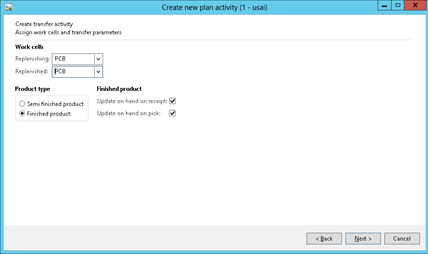
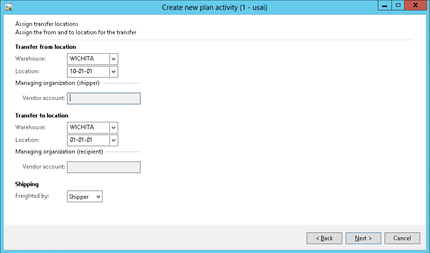
- Then specify the To and from locations for the transfer, and click Next.
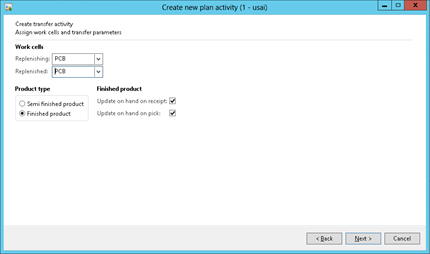
- Then specify the To and from locations for the transfer, and click Next.
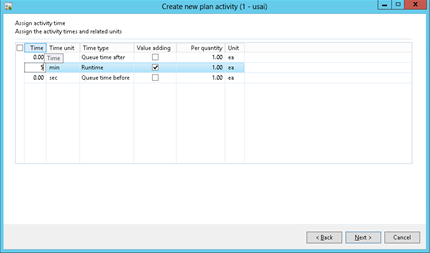
- Finally specify the time for the transfer activity, and finish stepping through the wizard until it closes.
- Once you have created the Transfer activity, click the Close button to exit the form.
Creating a Kanban Transfer Rule
The second step in configuring the Kanban Transfer is to create a rule that will tell the system how to replenish the location.
How to do it…
To set up a Kanban Rule for the transfer, follow these steps:
- From the Production Control area page, select the Kanban rules menu item from the Lean manufacturing folder within the Setup group.
- When the Kanban rules maintenance form is displayed, click on the Kanban rule button within the New group of the Setup ribbon bar.
- From the Type dropdown, select the Withdrawal option.

- This will allow you to select the Transfer replenishment activity that you defined in the last step.

- Within the Quantities tab, set the Default quantity field to be the standard quantity that you want to start off with in the Kanban’s (a.k.a. Bins) and then set the Fixed kanban quantity to be the number of Kanbans that you want to use.
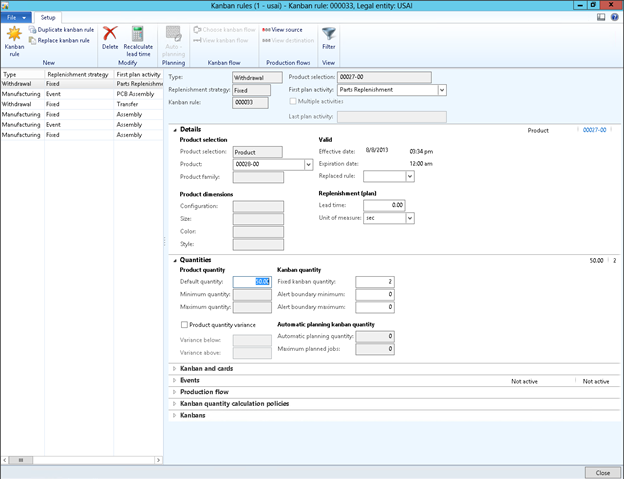
- Since we are just creating this rule, we can tell the system to create the initial Kanbans by opening the Kanbans tab and then click on the Add menu button.
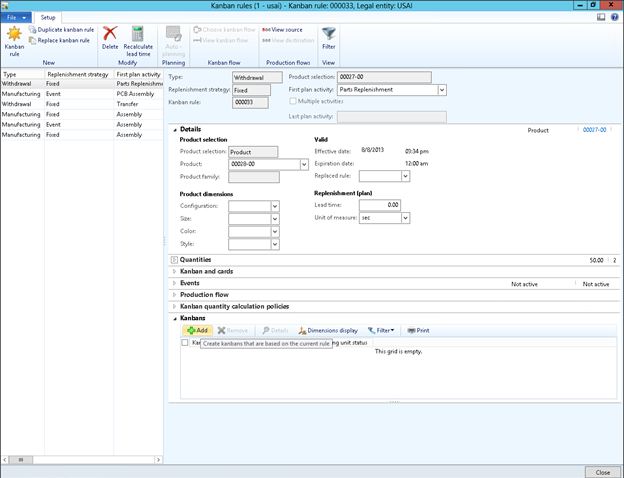
- This will open up a dialog box that allows you to specify the number of Kanbans that you want to send initially to the Transfer Planning board.

- Once you have done this, then you will see the Kanbans in the detail pane, and you can click on the Close button to exit the form.

Executing Transfers through the Kanban Board for Transfer Jobs
Once the Withdrawal Kanbans are created within Dynamics AX, then they will show up for the inventory managers through the
Kanban Board for Transfer Jobs, giving them a simple way to see what needs to go where within the warehouse.
How to do it…
To perform transfers through the
Kanban Board for Transfer Jobs, follow these steps:
- From the Production Control area page, select the Kanban board for transfer jobs menu item from the Lean manufacturing folder within the Common group.
How it Works…
Any transfers that have been suggested through Lean Manufacturing will automatically show up on this form.
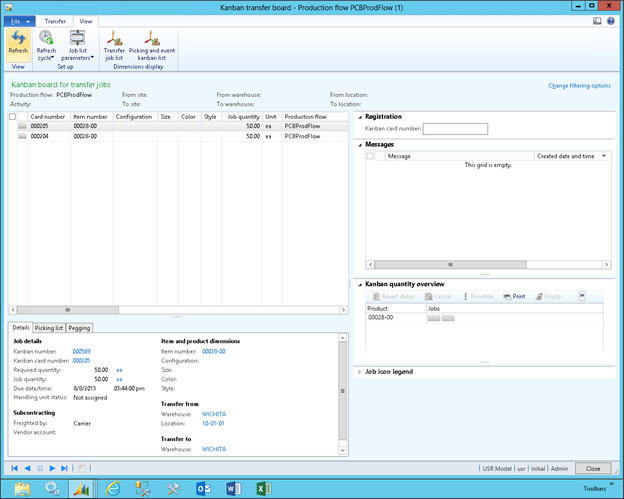
To start a picking process, click on the Kanban withdrawal that you want to start the transfer on, and click the
Start button within the
Transfer group of the
Transfer ribbon bar.

If you look at the inventory, then the from warehouse location will show the commitment for the transfer, and the to location will show the expected quantity that is about to be received.
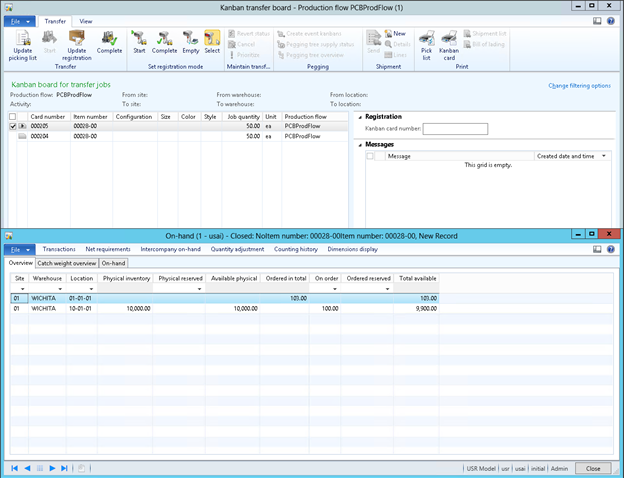
To mark that the transfer has been performed, click on the click the
Complete button within the
Transfer group of the
Transfer ribbon bar.
Looking at the inventory levels will show that the inventory has been transferred.
 Marking Transfer Kanbans as Empty through the Transfer Board
The
Kanban Board for Transfer Jobs has an additional function that we will highlight which allows the user to mark Kanbans as being empty. When this is done, then the replenishment Kanbans for the work cell will be automatically created.
How it Works…
From the
Kanban Board for Transfer Jobs, you can select the Kanban that is currently empty on the right hand side, within the
Kanban quantity overview panel, and then click the
Empty menu button to mark the Kanban as empty.

The Transfer Board will make a note in the
Messages tab that the Kanban was emptied.
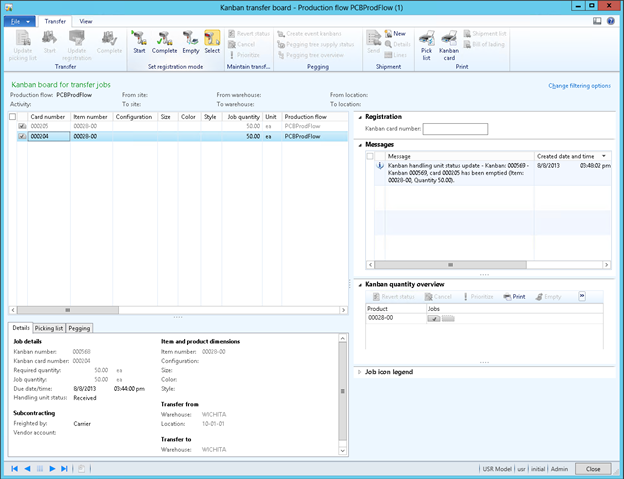
And the next time that the Kanban view is refreshed, a new replenishment order will appear.
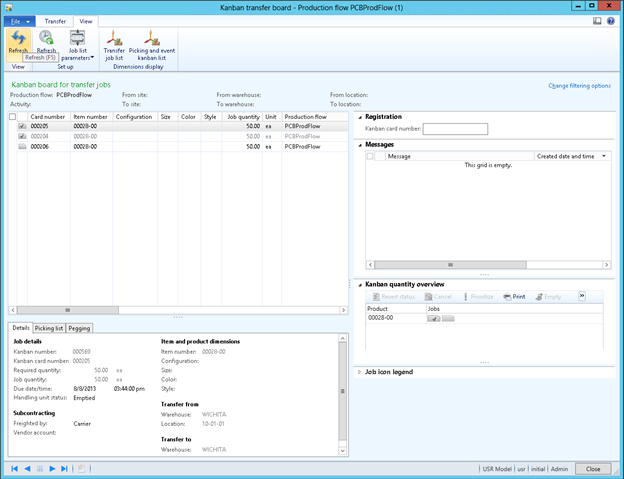
How cool is that!
Summary
In this worked example we worked through the setup of a set of simple production and transfer Kanbans. The interesting thing about these processes, is that you don’t necessarily need to be a Lean Manufacturer in order to take advantage of these capabilities. For piece work, then this process works really well, and also the transfer Kanbans can easily be used by traditional manufacturers to replenish floor stocking areas.
Once you have worked through these examples, you may want to branch out and try other areas of the Lean Manufacturing that we didn’t address in this presentation. Features that you may want to try include:
- Having multiple activities in a Process Flow that are chained together.
- Using the bar code scanning to further automate the job reporting process
- Using the planning and scheduling in conjunction with the Lean Manufacturing to create the purchase forecasts etc.
This is a really useful feature within Dynamics AX. Just because you have always used BOM’s and Routes does not mean that you can’t dabble in Process Flows and Activities. Give it a try and I’m sure you will like what you find out.


Источник:
http://atinkerersnotebook.com/2013/0...amics-ax-2012/


